Adobe Lightroom has been a critically important application to my photographic workflow, but from early on watermarking functionality has been limited. The standard copyright text line provided by Adobe Lightroom is enough, but lacks the ability to be customized giving photographers using it some level of individuality. As noted in my earlier blog articles on watermarking watermarks are not only functional to avert image theft, but a key component of branding.
Enter LR2/Mogrify, a Lightrooom plug-in created by Timothy Armes, that adeptly fills the void. Mogrify provides functionality to apply borders, text and graphical watermarks. Mogrify also harnesses the power of Lightroom to batch process photographs. The combination of these functions makes for an incredibly valuable photographic solution.
Since the end of 2008 I have been a diehard LR2/Mogrify user. The cost for Mogrify is what you are willing to pay. It is donation based and receiving the activation key opens up all functionality with in the plug-in (otherwise you’re limited to watermarking 10 images per export).
How I Use Mogrify
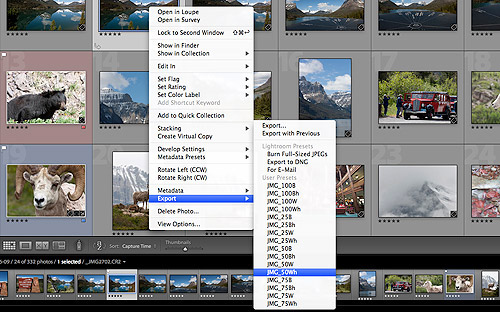
Once I finalize my highest rated images per photoshoot (post-process, add metadata, etc.) I select one or all and right click to Export my photos for web display. In Lightroom I use the Mogrify plugin to apply a transparent graphical watermark. Depending on the tonal range of the image I’ll select preset export settings to apply a watermark with the appropriate opacity and color (white or black). The watermarked images created from these automated exports are then used for all my online activity (e-commerce site, photo forums, personal blog, etc.).
My Mogrify Set-up
It just so happens that I needed to set up my laptop with Mogrify so that I could keep momentum moving for my online efforts while abroad. Below are steps I’ve taken to set up my laptop, mirroring my home workstation configuration, to export my photographs for web use.
- Download Mogrify & uncompress it.
- Place the plug-in in a folder of my choice for Lightroom Plug-ins
- Load Lightroom 2.x
- Go to File Menu > Plug-In Manager and add/locate the Plug-in
- Enter my Activation Code and click the “Done” button
- Load images from a folder, make your selections and right click to “Export”
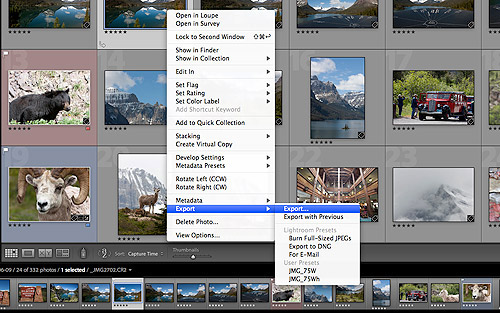
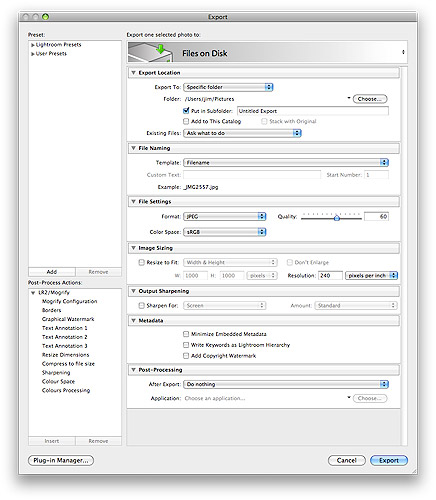
6. An Export window will load with a variety of options. In the bottom left corner are Mogrify options that can be added as an export option in the main Export window.
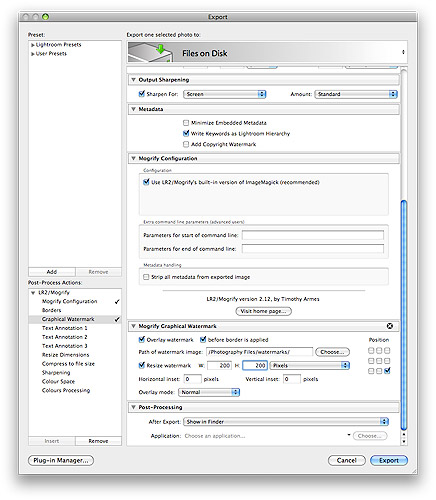
7. Seeing as how I’m interested in using a Graphical watermark I select the Mogrify option “Graphical Watermark” and press the “Insert” button. In the process the “Mogrify Configuration” option will automatically be added.
8. From top to bottom the following configurations are made to the…
Default Settings:
- “Export to a specific folder” is selected so that all saved files go to a folder titled “watermarked photos”.
- File names are customized adding a suffix of “_c” before “.jpg” to designate that the photo has been watermarked, contains metadata and has been resized.
- Sharpening options are set to “Screen”/”Standard” since my images are to be used exclusively online.
- Metadata is set to be embedded in the image file via the check box “Write Keywords as Lightroom Hierarchy”.
Mogrify Graphical Watermark Settings:
- Specify the location of my watermark graphic (a transparent PNG file)
- Select the location on my images where my watermark will appear
Note: You can have the watermark appear multiple times - Configure the dimensions of the watermark as it is to appear
Note: This is a fixed value as opposed to a percentage - Specify the overlay mode to “Normal”
- Specify exported files will be shown in the finder.
9. At the conclusion of my setting configuration I will click the “Add” button at the bottom of the Presets pane on the left of the Export window. This will save the presets for future reference.
10. I’ll repeat step 8 for each watermark variation that I create. I have a total of 16 settings total that I reference.
25% White (horizontal & vertical)
50% White (horizontal & vertical)
75% White (horizontal & vertical)
100% White (horizontal & vertical)
25% Black (horizontal & vertical)
50% Black (horizontal & vertical)
75% Black (horizontal & vertical)
100% Black (horizontal & vertical)
For an image with a maximum dimension of 500 pixels I set my horizontal watermarks to be no greater than 200 pixels wide and my vertical watermarks to be no greater than 160 pixels wide. As of late I’ve been experimenting utilizing the smaller watermark for horizontal and vertical images to keep things simple.
Now as I work I can right click on an image or set of images and select an Export Preset saving me time and effort that would otherwise be spent individually configuring my watermarks.
For those familiar with my online photographic images the output is exemplified in the following photo. Is my process perfect? I can’t say that it is as I’m likely to refine it over time. Thanks to LR2/Mogrify I have the means to fine tune functionality & presentation options that are otherwise missing from the default install of Lightroom 2.x. It is for that reason that I highly recommend LR2/Mogrify to others interested in watermarking their photographs in a quick and efficient manner.
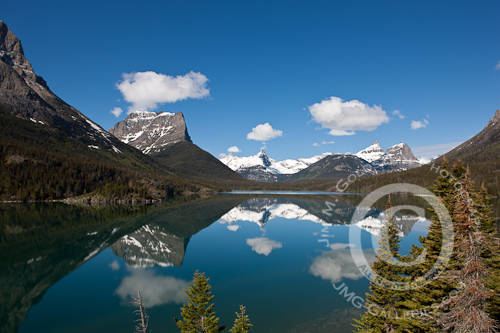
St. Mary's Lake - Glacier National Park
Try It You’ll Like It
If you’d like to try out Mogrify visit Timothy Armes web site.
You might also want to follow him on Twitter (@timothyarmes)
If you’re interested in learning more about Mogrify and other border/watermark capabilities check out:
Watermarking with Lightroom and LR2/Mogrify – The Lightroom Queen
She is also someone you may want to follow on Twitter (@lightroomqueen)
[tags]Lightroom, Mogrify, Tips & Tricks, Tutorial, Software, Photography, Lightroom Queen, Timothy Armes, Adobe Lightroom[/tags]

The watermark options of Lightroom you’ve mentioned above are good but not outstanding. I have the same or even more with Bytescout Watermarking Pro which I bought for its extremely intuitive interface. The one I like about Lightroom is donation system instead of buying at fixed price 🙂
Pls, I want to watermark the date, but without the time in mogrify on lr. The OrginalDateTime token works but puts the date and time and i dont want the time. Have you a solution for this?
Tks!
thanks for the reminder for me to donate Jim. I actually ran into the 10 image limit today.
Ralf thanks for the tip on Bytescout Watermarking Pro. I’ll check them out to see how they compare.
Theodoro I’ve not messed with that function, but I’m sure if you wrote Timothy Armes directly he might be able to point you to a solution. His contact info on Twitter is in my blog post.
It’s a great app and well worth the donation. Glad to see you’re of the same mindset. Thanks for the heads up to Topaz on your blog.
Great writeup Jim, one of my most often used Plugins for LR. I just can’t believe this is not built-into LR.
My technique is very similar to your, but I use a transparent image with the text embossied and transparent to make the watermark even more subtle.
Take care,
-J
Pingback: Interesting tools and techniques « Close Nature
Pingback: Lightroom watermarking | Alaska Photography
Pingback: 10 Must Read Copyright Articles for Photographers » JMG-Galleries – Jim M. Goldstein Photography